Check for Updates
This guide explains how to:
- Check for available updates and update WPS (three possible methods).
- Change the frequency at which WPS checks for new updates.
1. Check for and Update WPS
There are three methods to check for and update WPS.
- Method 1: Help Menu → Check for Updates → Plug-in Installer → Next → Restart.
- Method 2: Tools Menu → Plug-ins → Updates Tab → Check for Updates → Update → Restart.
- Method 3: Tools Menu → Plug-ins → Available Plug-ins Tab → Check for Newest → Install → Restart.
Updating via the "Help" menu
- In the top menu, click "Help."
- In the drop-down menu, select "Check for Updates."
- A window called "Plugin Installer" will appear.
- If WPS is up to date, the message "Your application has been updated! No updates are available."
- If updates are available, a list of the plugins to be updated will be displayed.
- If updates are available, click "Next >" to start the update.
- When finished, restart WPS.
Visual example:
 Top and drop-down menus with the "Help" and "Check for Updates" options highlighted, respectively.
 "Plugin Installer" window with the message "Your application is up to date! There are no updates available.".
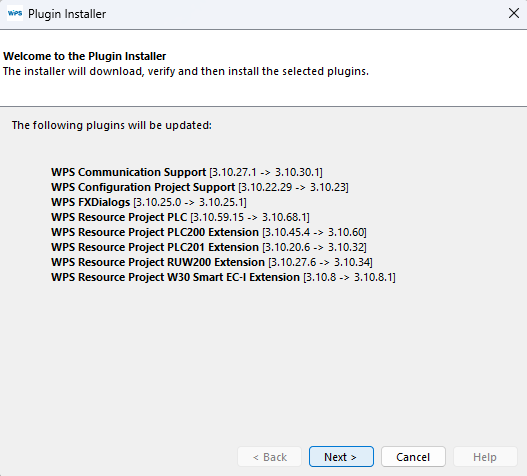 "Plugin Installer" window showing a list of plugins available for updating.
Updating via the "Tools > Plugins > Updates" menu
-
In the top menu, click "Tools".
-
In the drop-down menu, select "Plugins".
-
A window called "Plugins" will appear; go to the "Updates" tab.
-
Click the "Check for Updates" button in the upper left corner.
- If WPS is up to date, a blank list will appear.
- If updates are available, a list of plugins to be updated will be displayed.
- If updates are available, click "Update" in the lower left corner to start the update.
- When finished, restart WPS.
Visual example:
 Top menu and drop-down menu with the "Tools" and "Plugins" options highlighted, respectively.
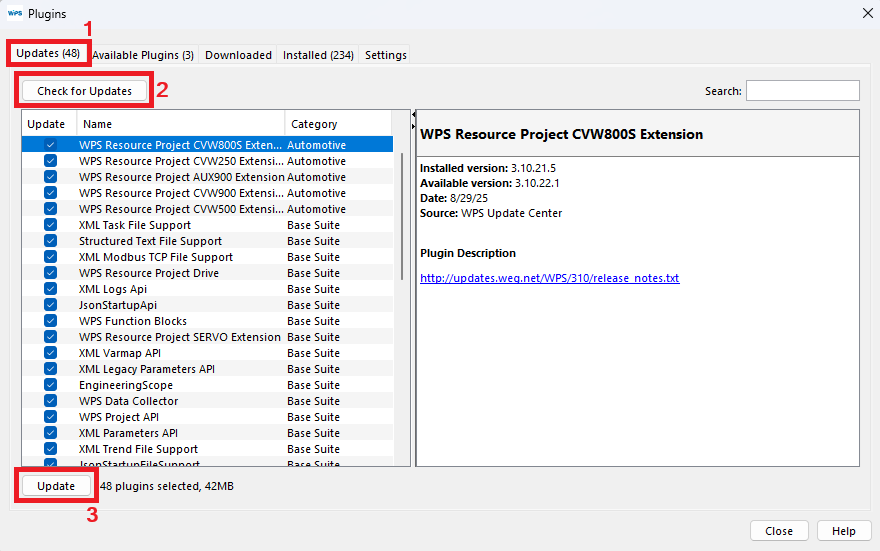 "Plugins" window showing the "(1) Updates" tab, with the "(2) Check for Updates" button, followed by the list of available plugins, with the "(3) Update" button after the list.
Updating via the "Tools > Plugins > Available Plugins" menu
In addition to keeping existing plugins up to date, it's important to check for new plugins available for installation. This ensures you have access to all the latest features.
- In the top menu, click "Tools".
- From the drop-down menu, select "Plugins".
- A window called "Plugins" will appear; go to the "Available Plugins" tab.
- Click the "Check for Newest" button in the upper left corner.
- If new plugins are available, a list of them will be displayed.
- Tip: Always keep this list empty and install new plugins when available.
- To install, select the desired plugins and click "Install" (located in the lower left corner, after the list).
- When finished, restart WPS.
Visual example:
Top menu and drop-down menu with the "Tools" and "Plugins" options highlighted, respectively.
 "Plugins" window showing the "(1) Available Plugins" tab, with the "(2) Check for Newest" button, followed by the list of available plugins, with the "(3) Install" button after the list.
2. Change the automatic check frequency
WPS allows you to configure how often it will automatically check for new updates.
Step by step:
-
In the top menu, click "Tools".
-
In the drop-down menu, select "Plugins".
-
A window called "Plugins" will appear; go to the "Settings" tab.
-
Locate the "Automatically Check for Updates" section.
-
In the "Check Interval" field, choose the desired frequency from the selector:
- Every Start
- Every Day
- Every Week
- Every Two Weeks
- Every Month
- Never
Note: It is recommended to keep the check at least weekly to ensure the application is always up to date.
Visual Example
Top menu and drop-down menu with the "Tools" and "Plugins" options highlighted respectively.
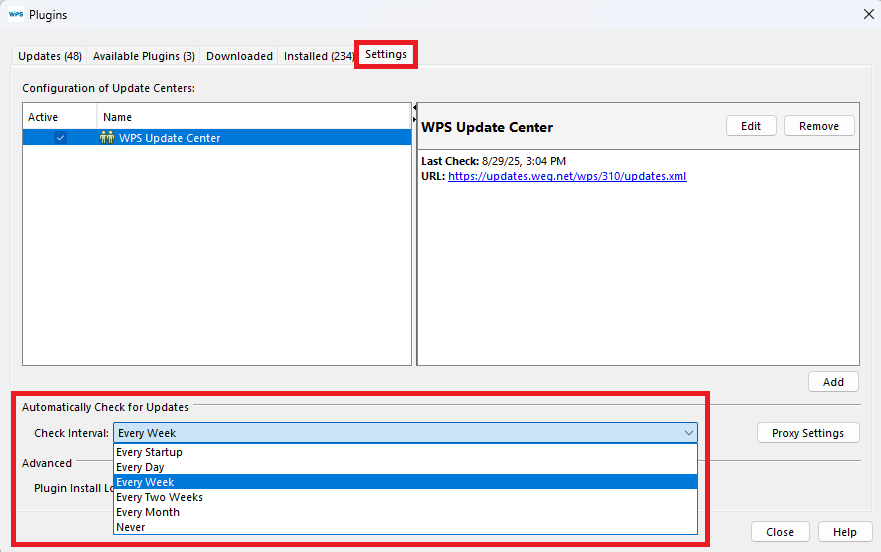
"Plugins" window showing the "Settings" tab, highlighting the "Automatically Check for Updates" section with the options selector open.