Workspace Overview
WPS is organized around a desktop workspace where you manage configurations, resources, editors, communication settings, backups, and maintenance tasks.
Use this section when you need to:
- Understand the main areas of the interface
- Create or modify configurations and resources
- Import or Export backups and binaries
- Update the application and its plugins
If you are new to WPS, start with the interface overview below, then continue with Create a Configuration and Create a Resource.
Main Window
The main WPS window is divided into six functional areas:
| No. | Area | Purpose |
|---|---|---|
| 1 | Menus | Access editing, view, communication, and help commands. |
| 2 | Toolbar | Provides shortcuts for the most common actions. |
| 3 | Configurations Window | Displays configurations and their resources. |
| 4 | Editor Window | Main editing area for ladder logic and other project elements. |
| 5 | Palette Window | Contains components that can be dragged into the editor. |
| 6 | Output Window | Shows compilation, communication, and download messages. |
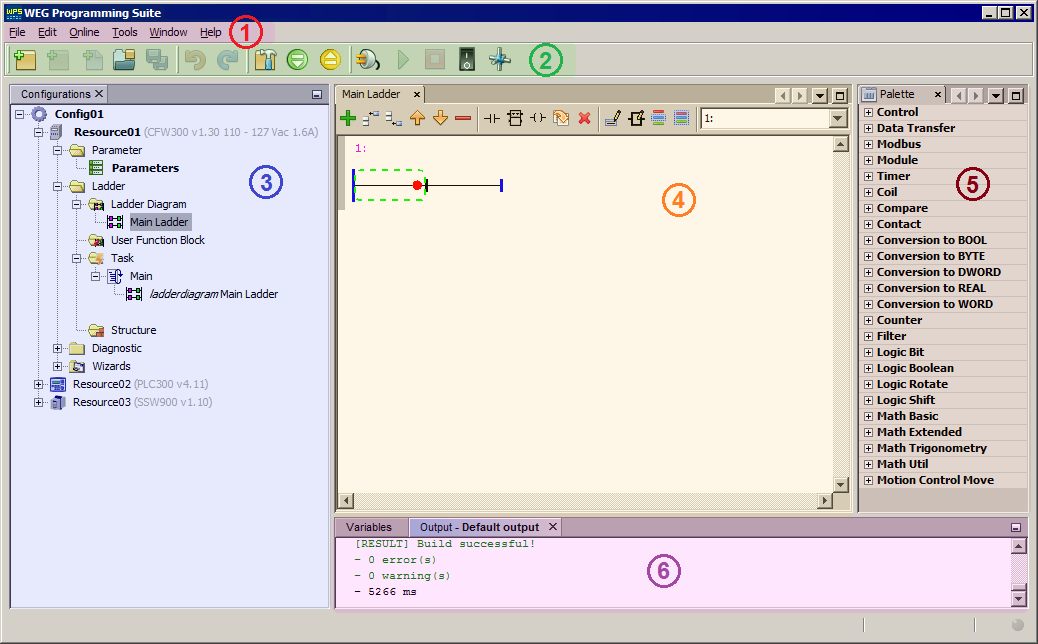
Most project actions in WPS start from either the configurations window or the resource properties dialog. Knowing where those areas are reduces navigation errors later.
Configuration hierarchy
WPS follows the IEC 61131-3 model and organizes projects into a fixed hierarchy.
| No. | Level | Description |
|---|---|---|
| 1 | Configuration | Top-level container for the software elements that make up an application. |
| 2 | Resource | Processing-capable element that executes programs. In WPS, each resource is associated with a product and has its own settings. |
| 3 | POU | Program Organization Units that define what executes, in which order, and how components interact. Functions, function blocks, and programs belong here. |
| 4 | Task | Scheduling elements that define when and how POUs run. |
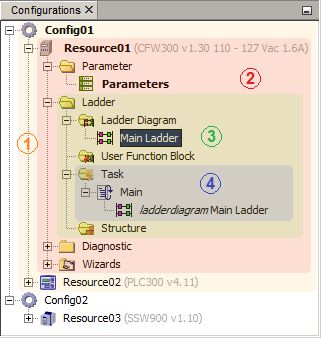
Global variables are defined at the application or resource scope, while local variables belong to a specific POU.
Welcome Window Summary
The Welcome Window is designed to route the user to the appropriate starting workflow:
- Use Quick Parameter Monitoring for temporary online access
- Use New Configuration to start a project
- Use Open Configuration to continue existing work
- Use Import Configuration to restore a backup
When the startup screen is no longer necessary, disable it using Always show Welcome Window and re-enable it later from:
(1) Menus > Help > Welcome.
Explore this section
Quick Start
Start common WPS tasks quickly, including monitoring, creating, opening, and importing configurations.
Create a Configuration
Create a new configuration and its first resource.
Create a Resource
Add a new resource to an existing configuration.
Context Menus
Use configuration and resource shortcut actions.
Import and Export
Move configurations, backups, and binaries between environments.
Import Special Versions
Load special XML databases for specific firmware versions.
Check for Updates
Update plugins and configure automatic checks.